Common Challenges in Vintage Car Interior Restoration
Restoring the interior of a vintage car brings the project full circle. While the exterior and engine often take the spotlight, the cabin is where the driver connects with the vehicle. Every detail inside tells a story, from the feel of the steering wheel to the stitching on the seats. A well-executed interior enhances comfort and aesthetics and boosts the car’s value and authenticity.
Interior restoration tends to surprise even experienced enthusiasts. What looks simple on the surface often reveals hidden complications — rust under the carpet, brittle wiring behind the dash, or mismatched colors from previous repairs. Restoring aged components while maintaining period-correct style requires patience, planning, and precision.
In this blog, we’ll explore the most common challenges faced during vintage car interior restoration. You’ll learn what causes these issues, how to spot them early, and which strategies help you solve them efficiently. Whether you're starting a full rebuild or refining the details, this guide will prepare you for a smoother, more successful restoration journey.
Tracking down original materials
Finding original materials for a vintage car interior often feels like a treasure hunt. Period-correct fabrics, trim pieces, and hardware rarely sit on modern shelves. Each component must reflect the car’s era, down to the texture of the seat vinyl or the thread used in the stitching. Without the right match, even high-quality restorations can look incomplete.
One of the biggest challenges involves grain and texture. Original vinyl or leather patterns may no longer be in production, and even slight differences in sheen or feel can stand out. Stitching styles and thread thickness also vary by decade and manufacturer, making accuracy essential for anyone aiming to preserve authenticity.
To locate rare or discontinued materials, connect with vintage upholstery suppliers specializing in classic vehicles. Browse online forums and restoration communities where enthusiasts share leads and product reviews. Visit local salvage yards for hidden gems — interiors in rough condition might still contain reusable trim, knobs, or seat frames.
If original materials remain unavailable, explore custom reproductions that mimic factory specs using modern processes.
A successful interior restoration begins with the right materials. Sourcing them may take time, but finding an exact match transforms your build from good to exceptional. Every texture, stitch, and surface plays a role in honoring the car’s legacy.
Dealing with rust and structural damage
Rust hides beneath carpets, behind panels, and under seat frames in many vintage interiors. Moisture builds up over time, corroding floor pans, brackets, and mounts. While surfaces might look intact, hidden decay often weakens the structure.
Inspect every area before installing new materials. Skipping this step risks poor fitment and ongoing damage beneath the surface. Fixing structural problems first protects your investment and ensures long-term results.
Remove rusted sections completely. Use wire brushes, grinders, or sandblasters to reveal the full extent of damage. Apply rust inhibitors, weld in new metal panels, and reinforce weak spots with factory-style brackets. Confirm fitment before moving on to upholstery or trim.
Restorations start from the ground up. Solid foundations support clean finishes, lasting comfort, and a safer, stronger interior.
Cracked dashboards and faded panels
Sunlight and time take a toll on vintage interiors. Dashboards crack, panels fade, and surfaces become brittle and dull. Heat and UV exposure cause plastic and vinyl to shrink, warp, and discolor, especially in vehicles stored without protection.
Cracks often begin near vents and gauges, then spread quickly. Panels lose color, develop uneven textures, and feel fragile. These issues affect both appearance and structural integrity.
Repair minor damage with fillers, flexible adhesives, and texture-matching paints. For larger cracks or severe warping, choose reproduction dashboards that match factory specs or consider custom replacements with vintage styling.
Restore faded panels using vinyl dyes or plastic renewers. Clean thoroughly, prep with adhesion promoters, and apply color evenly. If panels are too brittle, replace them with salvaged or reproduction parts that match the original look.
A well-restored dash sets the tone for the entire cabin. Whether you repair or replace, these upgrades bring cohesion, durability, and renewed character to your interior.
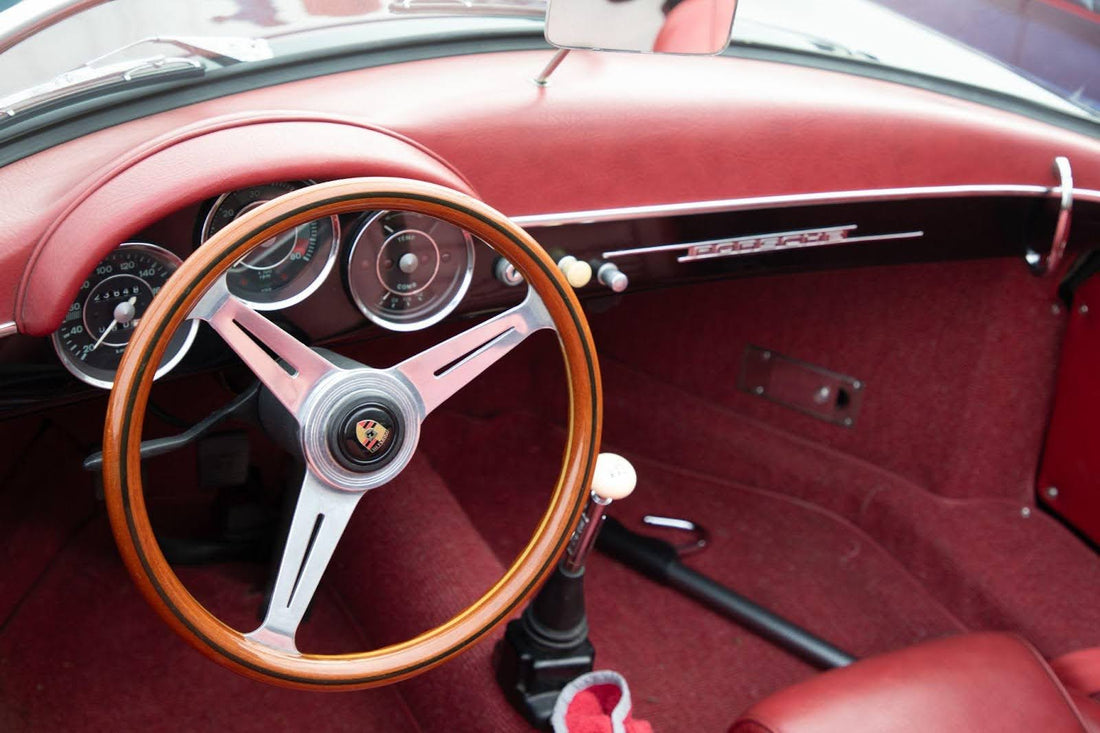
Restoring or updating gauges and electronics
Gauges and electronics shape both the function and feel of a vintage car interior. Speedometers fail, fuel gauges read inaccurately, and dash lights dim or stop working. These problems affect safety and disrupt the driving experience.
Preserve the original look while improving reliability. Many shops rebuild vintage clusters with modern internals, delivering accurate readings behind a classic face. If gauges are beyond repair, use reproduction units that match factory style.
Outdated wiring often creates hidden issues. Inspect behind the dash, trace each wire, and replace brittle or corroded sections with modern, high-quality wiring. Use labeled harnesses and color-coded lines to support future upgrades.
Add modern features that blend into the design. Install LED dash lighting for clarity and longevity. Tuck USB ports, Bluetooth modules, or audio controls behind panels to keep the layout clean.
Restoring gauges and electronics improves both function and aesthetics. Reliable readings and clean wiring bring peace of mind, while subtle upgrades keep your interior classic and capable.

Rebuilding seats and upholstery
Seats define comfort, style, and the overall feel of a vintage car interior. Over time, springs sag, padding flattens, and fabric wears down. What once looked sharp often ends up faded and misshapen.
Start by evaluating each seat. Press the cushions, check the stitching, and inspect the frame for rust or damage. If the structure remains solid, reupholstery restores the original form with fresh foam, quality materials, and proper stitching.
Consider replacement kits for heavily damaged seats. These pre-cut sets follow factory designs and simplify installation while preserving a period-correct look. If you want full creative control, custom fabrication allows seat reshaping, added support, and comfort upgrades like heat or lumbar adjustment.
Choose an approach that balances authenticity and usability. Preserve classic patterns and textures while improving comfort and durability. Rebuilt seats preserve the identity of your vintage build.
Matching colors and finishes across surfaces
A cohesive interior starts with consistent colors and finishes. Over time, sunlight, moisture, and wear cause materials to age unevenly — vinyl fades, fabric discolors, and plastic loses its shine. These changes create mismatched tones that break the flow of the cabin.
Compare panels, trim, and upholstery under different lighting. Even small shifts in hue or gloss affect the final look. Study how each material reflects and absorbs color to guide your restoration choices.
Use quality dyes and paints to blend old and new components. Apply vinyl dyes to seats and dash pads, and use interior-grade paint for hard plastics and metal. Prep surfaces carefully and test on hidden areas for the best results.
When replacing parts, look for restoration-grade pieces that match factory specs. When sourcing, reference original color codes or bring samples.
Consistent finishes tie the interior together. Focus on visual flow to create a cabin that feels intentional, polished, and true to the vehicle’s character.
Upgrading without losing vintage charm
Blending modern upgrades into a vintage car interior takes careful planning. Aim to improve comfort, safety, and performance while preserving the original design’s character.
Start with low-profile enhancements. Hide Bluetooth audio systems behind the dash or glovebox. Add insulation under carpets to reduce heat and sound. Route wiring through concealed channels to keep electronics subtle.
Choose components that match the era. Use period-style switches, analog-style gauges with digital accuracy, and chrome-trimmed controls. Integrate USB ports and climate controls into existing trim to maintain a cohesive look.
Focus on balance. Keep defining features like steering wheels, badges, and seat patterns intact while improving usability. Every choice should respect the vehicle’s heritage and elevate the driving experience without altering its identity.
Budget overruns and time delays
Vintage car interior restorations often take more time and money than expected. A simple refresh may uncover hidden damage, rare parts, and rising material costs. Without solid planning, even a focused project may fall behind and run over budget.
Many builders underestimate the cost of quality materials, expert labor, and surprise repairs like rusted floors or damaged frames. Custom upholstery and rare trim quickly increase expenses, especially when sourced from specialty suppliers.
Shipping delays and part backorders stretch timelines. Even one missing component — like a dash insert or matching fabric — halts progress.
Start with a detailed budget that includes a cushion for surprises. Prioritize must-have upgrades and consider working in stages. Research parts early to avoid delays and stay flexible with your schedule.
With preparation and patience, you protect your investment and create a smooth restoration process that leads to a rewarding final result.

Rod Doors is ready to help you get your classic car interior ready to roll
For interior components that meet the highest standards of craftsmanship and design, trust Rod Doors. Our custom panels, armrests, and trim solutions make it easier to achieve a cohesive, professional finish that honors the spirit of your classic build.
Whether you're replacing worn elements or creating a fully tailored cabin, contact Rod Doors for the quality, fit, and aesthetic you need to elevate your restoration.