A Comprehensive Guide to Classic Car Interior Restoration
Restoring a classic car transforms a relic of the past into a statement of passion, precision, and pride. Every turn of the wrench, every stitch in the upholstery, and every polished surface tells a story. Enthusiasts embrace the process to reconnect with history, honor family legacies, or elevate a timeless machine into a head-turning masterpiece.
Beyond the thrill of the build, a well-executed restoration adds serious value, often turning a labor of love into a smart investment.
While most restorers pour their energy into reviving the engine or perfecting the exterior, the interior often gets overlooked. Yet this is where the real connection happens. It’s the space where hands grip the wheel, eyes scan vintage gauges, and memories take shape.
This guide explains everything you need to restore your classic car’s interior from start to finish. You’ll assess wear and tear, plan your upgrades, choose the right materials, and confidently handle every detail — from seat repairs and dashboard fixes to trim, flooring, and reassembly.
Whether you’re chasing showroom style or creating a clean, comfortable ride, this guide gives you the tools to revive your interior with purpose and precision.
Assessing the interior condition
Before you begin restoring a classic car’s interior, take time to inspect every detail with care and intention. A thorough assessment sets the foundation for a successful project and helps you prioritize repairs, replacements, and upgrades.
Start by evaluating the seats. Check for torn upholstery, sagging cushions, broken springs, and worn-out stitching. Examine the dashboard for cracks, fading, peeling veneer, or broken controls.
Test each switch, dial, and gauge to confirm whether it functions properly or needs repair. Look closely at the door panels for warping, scuffs, or loosened trim. Inspect the carpet for stains, thinning areas, or signs of moisture damage.
Remember the headliner, rear panels, and console. Each contributes to the overall condition and authenticity of the classic car’s interior.
Pay special attention to original features. Items like factory stitching patterns, vintage knobs, branded seatbelt clasps, or custom-molded trim often carry significant value. When possible, preserve these details or source accurate replacements that honor the original design. If your goal is to maintain historical accuracy, these elements deserve top priority during planning and budgeting.
As you move through the car, document everything. Take clear, well-lit photos of damaged areas. Jot down detailed notes for each section, including materials, colors, and visible wear. Measure fabric panels and other soft elements to ensure correct sizing when ordering replacements.
This visual and written record streamlines sourcing parts, working with upholsterers, and keeping your restoration project organized from start to finish.
Setting a budget and goals
Start your restoration with a clear vision. Decide whether you want a factory-authentic showpiece, a comfortable daily driver, or a blend of both. Your goal will guide your choices, from materials to upgrades.
Establish a realistic budget by prioritizing key components like seats, the dashboard, or the center console. OEM parts offer authenticity and value, while aftermarket options provide flexibility. Choose where to invest and where to save without compromising quality.
Decide which tasks you’ll handle yourself and where professional help makes sense. Simple jobs may suit a DIY approach, but complex work like upholstery or wiring often requires expert skills.
Source parts strategically. Explore salvage yards, online forums, and specialty retailers. Compare quality, compatibility, and price before making a purchase.
With well-defined goals and a smart budget, you streamline the process and create an interior that aligns with your vision and adds lasting value.
Disassembly and labeling
Disassemble your classic car’s interior with care to avoid damaging rare parts or losing hardware. Start with large components like seats and consoles, then move to panels, the dashboard, and flooring. Use the correct tools and keep your workspace organized.
Label every piece clearly. Store bolts, clips, and screws in separate bags with notes, and mark wiring connections to prevent confusion later. Take photos throughout the process to document the layout and order.
Store components in a clean, dry space. Wrap fragile items and keep panels upright to avoid damage. Wear gloves and ensure good ventilation when removing old adhesives or insulation, and always disconnect the battery before handling electrical parts.
Detailed labeling and careful handling make reassembly faster, easier, and more accurate.
Upholstery restoration

Refreshing your classic car’s upholstery instantly upgrades the entire interior. Based on the material’s condition and your restoration goals, evaluate whether to reupholster, dye, or replace. Reupholstering offers full control with new fabric, leather, or vinyl, while dyeing works well for surfaces that remain structurally sound. Replacement kits provide an easy solution for heavily worn seats.
Choose materials that align with your needs. Vinyl offers durability and easy maintenance, leather adds elegance with extra care, and fabric delivers comfort with a vintage touch. Match colors and textures to your interior for a cohesive look.
To maintain authenticity, replicate original stitching, pleats, and patterns. Use reference photos, period-correct thread, and work with skilled upholsterers when needed. With the right approach, your restored upholstery adds comfort, style, and value to your finished build.
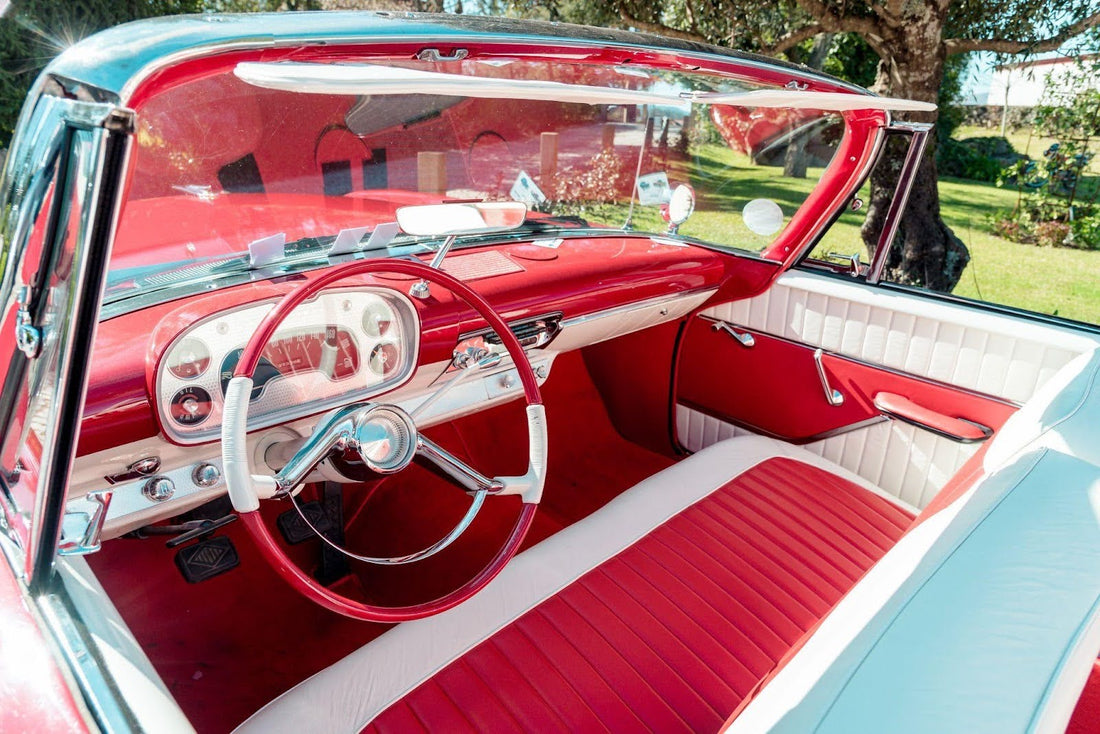
Dashboard and instrument panel
The dashboard and instrument panel define the look and function of your classic car’s interior. To restore them, start by repairing cracks, fading, or warping using fillers, wraps, or full replacements. Choose materials that match the original design for an authentic finish.
Clean and polish gauges and knobs, replace broken components, and upgrade bulbs for better visibility. Recalibrate instruments and consider restoring faded gauge faces for a crisp, period-correct look.
While the dash is open, inspect and replace old wiring with modern, heat-resistant options. Add fuses or relays to protect new components, and label everything for easy reassembly.
A fully restored dashboard combines visual impact with reliable performance, completing your interior with both style and function.
Carpet and flooring
Replacing the carpet and flooring in your classic car refreshes the interior and improves comfort. Start by removing the old carpet, adhesive, and sound deadening. Inspect the floor for rust or damage, then repair and prep the surface for new materials.
Choose a pre-cut carpet kit for a quick, accurate fit or go custom for full control. Measure carefully and test placement before installation. Add insulation like mass-loaded vinyl or jute padding to block heat and road noise.
A well-fitted carpet and soundproofed floor create a quieter, cleaner, and more refined interior that enhances every ride.
Headliner and door panels
The headliner and door panels add cohesion and style to your classic car’s interior. These elements influence acoustics, define the cabin’s feel, and tie together textures and colors.
Start by removing the old headliner material and cleaning the surface. If the board remains intact, apply foam-backed fabric with high-temperature adhesive, stretching it smoothly to avoid wrinkles. Replace the board if it's damaged and choose fabric that matches or complements your interior.
Assess the condition of the door panels and determine whether to clean, reinforce, or replace them. Restore original door cards by fixing backing boards and reapplying fabric or vinyl. Swap worn handles and trim with replicas or refinished parts. Use polish or vinyl paint to bring hardware back to life.
Match textures and tones carefully across surfaces. Bring fabric swatches to ensure consistency in lighting. If restoring in stages, take notes and photos to keep your updates visually aligned.
A clean headliner and sharp door panels instantly elevate your interior, creating a refined, well-balanced finish that enhances both aesthetics and comfort.
Steering wheel, pedals, and trim details

Finishing touches like the steering wheel, pedals, and trim define the personality of your classic car’s interior. These elements shape first impressions and tie the entire space together.
Start by restoring the steering wheel based on its material. Refinish wood for a rich, natural look, rewrap or dye leather for softness and grip, or refinish plastic with filler and paint. Ensure the final result feels secure and era-appropriate.
Replace worn pedal pads and shift boots to sharpen the cabin’s appearance. Upgrade or polish trim rings, bezels, and accent pieces to bring back their original shine. Use non-abrasive polish on chrome and apply plastic-specific cleaners to revive color and detail.
These small upgrades create a polished, cohesive interior that honors the craftsmanship and style of your classic build.
Electronics and audio
Upgrading your classic car’s electronics enhances comfort and reliability while preserving its vintage charm. Start with the radio by installing a retro-style unit with modern features like Bluetooth, or hide a receiver in the glovebox for a clean look. Pair it with upgraded speakers for improved sound without altering the dash.
Check and replace interior lights with LEDs for better visibility. Restore the cigarette lighter, and update the clock with a quartz movement for dependable function that retains its original appearance. Inspect all wiring for wear, replace damaged sections with modern, heat-resistant wires, and clearly label every connection. Add fuse protection to safeguard new components.
With thoughtful upgrades, you maintain the authentic look while adding modern performance and safety, creating an interior that honors the past and works for the present.
Reassembly and final touches
Reassembly brings your restoration full circle. Start by organizing your parts, using photos and notes to guide each step. Install major components first, then move to smaller trim pieces, taking care to align everything properly and protect surfaces from scratches.
After everything is in place, give the interior a detailed finish. Condition leather, polish trim, clean plastic, and freshen the air with a fabric-safe deodorizer. These final touches elevate the space and make it feel complete.
Capture the transformation with before-and-after photos to celebrate your progress and share your results. With focus and precision, reassembly turns your vision into a finished interior that honors the car’s heritage and showcases your dedication.
Confidently restore your car with Rod Doors
Rod Doors offers some of the best custom interior solutions for classic car enthusiasts. Our premium door panels, armrests, and accessories combine precision craftsmanship with modern materials, giving you the tools to bring your vision to life without compromising authenticity.
Whether you're building a showstopper or a weekend cruiser, Rod Doors provides the parts and support to make restoring a classic car easy and enjoyable.
Explore the full Rod Door collection and take your interior transformation to the next level with products built to fit, last, and impress.